- Red and white fondant
- Rolling pin
- Oval cutters (I utilized two sizes)
- Heart and butterfly-shaped cutters
- Large square cutter
- Food safe brush & water
- Round tip (in this case, I used Wilton tip 12)
- Fondant or pizza cutter
- Small spatula
- Modeling stick (or toothpick or any “pointy” tool you might have in the kitchen)
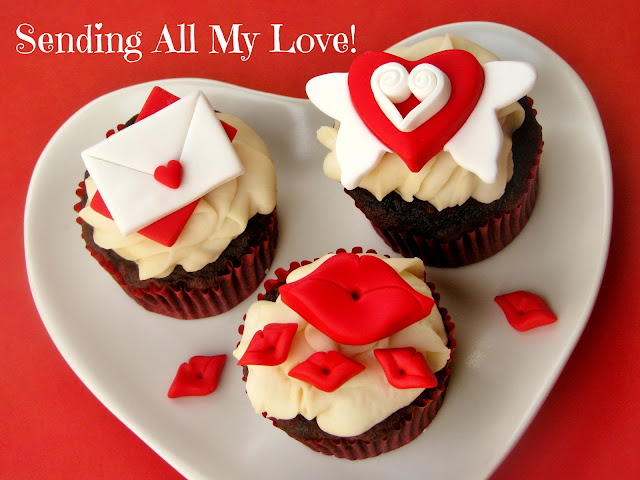
Start out by rolling some red fondant into a ball and pressing it down on a flat surface until it is approximately 1/2″ thick. Cut out an oval shape with the larger cutter and begin to pinch the shape on both sides to create the sides of the mouth.
At the same time, use your fingers to soften the perimeter of the mouth to round it out. With a heart cutter, position the top in the middle of the fondant lips and lightly press to make an indentation. Create a small separation at the top of the lips with the small spatula and finish the kissing lips with the modeling stick through the center.
You can repeat the process with the smaller oval cutter to make small lips for blown kisses!
Moving on to the heart with wings topper, roll out some more red fondant (approx. 1/4″ thick) and cut out a heart shape with the cutter and put it aside.
Roll out some white fondant and utilize the butterfly cutter to punch out the shape to utilize as wings. With the spatula, cut the butterfly shape in half and space the two halves so that they would contour the heart. Trim off the excess with the heart shape cutter. Brush some water on the wings and attach them to the red heart and allow it to dry.
For the quill heart decor, roll out more white fondant about 1/8″ thick (you can see I like to use rolling pin guide rings to keep it consistent and flat across) and cut out a strip about 1/4″ wide with the rolling cutter. I measured about 4 inches and then turned it upside down and added some water with the brush to both ends of the strip.
Begin to roll both sides inward until they come together, while positioning the bottom into a point for the bottom of the heart. Add a bit more water to attach the two quilled sides together.
Attach it to the winged heart by brushing water to the back and placing it in the center of the red heart.
You can play around with the quilling process and make additional hearts in all different colors and sizes!
For the love letter and envelope, roll out white fondant 1/8″ thick, cut out a square with the cutter and then cut it in half once again.
Turn the square cutter on a 45 degree angle and position it over the fondant rectangle, making sure one side is right up to the edge of the shape to make the fold of the envelope. Trim off the excess to make the envelope even. Then roll out some red fondant and repeat steps to cut it to scale with the envelope, but avoiding the indentation step.
With the remaining red fondant, punch out a small circle with the size 12 tip and start pinching it together at one end to create the bottom of the heart. With the spatula, create an indentation for the top of the heart and glue it onto the envelope. Brush some additional water to the bottom of the envelope to attach to the red letter.
Hoping these cupcakes and toppers will help you send all your love to your Valentines and make their day all that much sweeter!!! ♥
Merci Beaucoup!

This page may contain affiliate links. For more information, please read my Terms & Disclosure policy.


Love love love this! Girl you make it look so easy!!
so adorable!!!
You’re amazing!
This tutorial was AMAZING! Thank you for sharing with all of us 🙂
So interesting seeing how you do your magic!
You are SO awesome! Thank you for sharing your talent! I love the tutorials!!!!!!
amazing — I really love these.
Olá!
Conheci seu blog há poucos dias e fiquei encantada com seu trabalho. Durante a leitura dos posts, descobri que você é brasileira e fiquei muito feliz. Nasci em São Paulo, mas atualmente moro em Salvador — Bahia, sou professora e cake designer, tenho uma filha com 5 anos de idade.
Parabéns!!!
Desejo saúde e muitas bênçãos para você e sua família.
Até mais.
Mônica Carvalho
Sabor do Céu
Oi Monica! Mil desculpas, mas acabei de ver a sua mensagem! Muito obrigada pelos elogios!!! Eu tambem nasci em Sao Paulo e morei la ate 11 anos quando mudei para os E.U.A. A minha filha vai ter cinco anos mes que vem! Temos muito em comum mesmo! Visitei o seu site e o seu trabalho e maravilhoso!!! ♥
Can you pleaase tell me how you did the yo gabba gabba cupcakes? Can’t find anyone in no , that can make them look like yours!
Mfasouleou@yahoo.com
In new jersey****
So beautiful!!!! muito obrigado!
Muito obrigada voce, Amy!!! ♥
You are incredibly talented! All of your work is beautiful and oh so creative!
Thank you so very, very much, Shannon! I truly appreciate your incredibly kind words! ♥