• Home
    • Blog
  • About
    • About Me
    • Press and Features
    • Terms & Disclosure
  • Sweet Life
    • Crafts & Recipes
    • Family Fun
    • Holidays
      • Valentine’s Day
      • Lunar New Year
      • Easter
      • Halloween
    • Sweet Shop
      • Sweet Finds
      • Publications
  • Sweet Parties
    • Lynlee’s Parties
    • Party Tips
  • Sweet Fondant
    • Fondant Topper Gallery
    • Fondant Tutorials
  • Sweet & Unique Book
    • Book Tour
    • Blog Tour
  • Contact
    • Facebook
    • Flickr
    • Instagram
    • Pinterest
    • Twitter

Lynlees

Never Miss a Post!

Thank Whooo Fondant Owl Tutorial

November 20, 2012 By Lynlee

Owls con­tin­ue to be extreme­ly pop­u­lar in many par­ties and decor these days! For the Fall issue of The Par­ty Dress Mag­a­zine, I made a super sim­ple and easy-to-fol­low tuto­r­i­al to make these lit­tle metal­lic fon­dant owls to dress up your Thanks­giv­ing desserts! Or fol­low the steps and sim­ply change the col­ors and shim­mer col­or to match any theme!

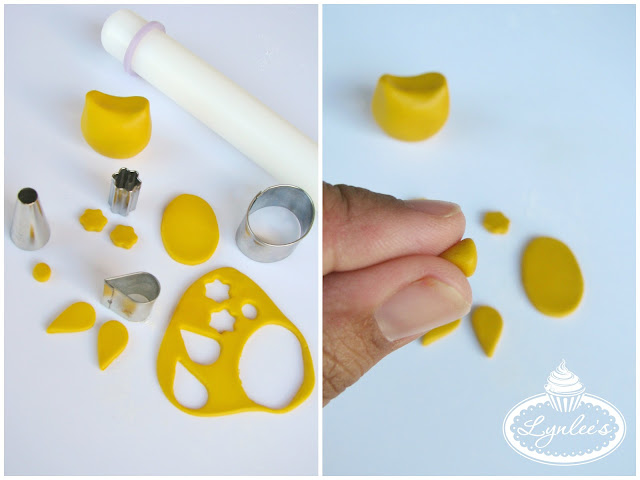
Sup­plies needed:
*yel­low fondant
*rolling pin
*oval, teardrop and flower cutters
*round tip {in this case, Wilton tip 12}
*mod­el­ing stick
*food safe brush and water
*gold shim­mer food col­or spray {Wilton Gold Col­or Mist used here}

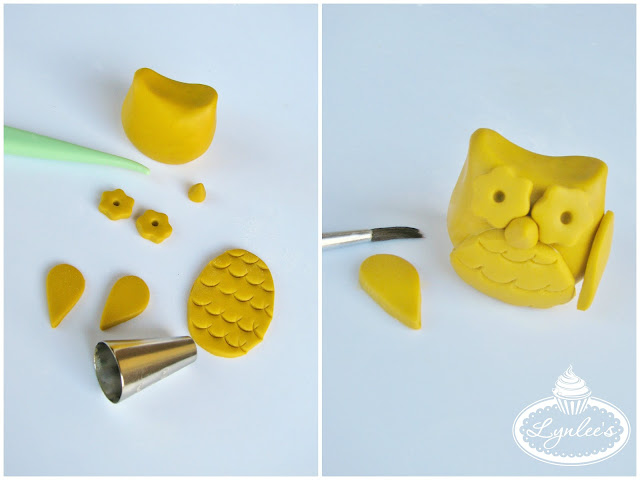
Step 1: Roll some yel­low fon­dant into a ball and shape tips of owl ears with fingers.

Step 2: Roll out more yel­low fon­dant flat with the rolling pin and use the cut­ters to cut out the nec­es­sary shapes {don’t for­get to cut 2x flower shape for eyes and 2x teardrop shape for wings}.

Step 3: Shape the small cir­cle into a ball and then use your fin­gers to make a tip for the owl nose.

Step 4: Uti­lize the mod­el­ing stick to make holes in the eyes. With the round tip angled at 45*, make inden­ta­tions in the large oval for a feath­er pattern.

Step 5: With the food safe brush dipped in water, glue all the fon­dant pieces to the three-dimen­sion­al owl figure.

Step 6: Cov­er your work­ing sur­face and spray the fon­dant owl with the shim­mer food col­or spray and let it dry!

I just want to take a minute and thank whooo?! Thank YOU for all the end­less and incred­i­ble sup­port! I am tru­ly so very thank­ful! Wish­ing you and your fam­i­ly the hap­pi­est of Thanksgivings! ♥

Merci Beaucoup!


This page may con­tain affil­i­ate links. For more infor­ma­tion, please read my Terms & Dis­clo­sure policy.
 

Share this:

  • Tweet
  • Email

Filed Under: Fondant Toppers, Tutorials Tagged With: autumn, cupcake toppers, cupcakes, fall, fondant, owl, party, thanksgiving, toppers

« Lynlee’s Christmas Patisserie
Lynlee’s Christmas Patisserie Giveaway »

Comments

  1. Golda says

    November 27, 2013 at 1:40 am

    AMAZING and CUTE!!!

Bienvenue!


Sharing inspiration as a
fondant artist, party stylist, lifestyle
blogger and book author!

Purchase My Book!

Sweet&Unique”=

Purchase My Class!

Search Lynlees

Follow Via Email

My Recent Pins

  • Gold Tone Hardware, Heart Shaped Detail, Top Carry Handle, Adjustable Detachable Crossbody Strap, Debossed Brand Logo Accents, 8.5In W X 11In H, 53.5In Strap, Fully Extended, Zip Closure, 1 Interior Zip Pocket, 1 Interior Slip Pocket, Non Leather, Imported | Cupid Heart Bag For Women
  • A Not So Scary Mickey Mouse themed Halloween party with a shabby chic look! See more party planning ideas at CatchMyParty.com!
  • Disney party table / food display, cute Mickey pumpkin for Halloween
  • Some great ideas for a Mickey's Not-So-Scare Halloween Supper Buffet. (I have seen the Mickey Mouse shaped plates at Target.)
  • Some fun buffet ideas for a Mickey Mouse & Friends Halloween Party.
  • Mickey Cupcakes
Follow Me on Pinterest

Join Us On Instagram

Copyright © 2025 Lynlee's • Website Customization by Brave Creative Design · Log in