Halloween is just around the corner and I’ve spent the past few weeks working on some fun designs and orders for the occasion! I’ve always loved celebrating Halloween and the Fall season, even before I a child! During those pre-baby days, I used to pretend my dog wanted to partake in all the festivities, as seen in this photo of our pumpkin carving (just in case, the one in the middle belonged to my dog)!
I also loved dressing up, but I was never into the scary costumes… I always wanted something fun and pretty! With the exception of being Oscar the Grouch one year when I was growing up (and sometimes still when I’m overly tired and grumpy!), I remember most of my costumes centering around girly characters, like Smurfette, She-ra and Madonna-types on more than one occasion. In the picture above, we had an 80’s theme party (my absolute fave decade!) and I was the girl from Flashdance and my husband was Maverick in Top Gun!
And then the kiddo came… and she definitely seems to be following in my footsteps. Actually, she’s actually surpassed me, as I was never a centerfold! She was dressed up as Little Red Riding Hood in a Target ad back in 2008!
Supplies you will need:
- Fondant dyed in desired colors ~ I used a beige for a more “vintage” look, but I definitely utilize white for more classic Halloween ghosts.
- Rolling pin
- Round cutter ~ I opted for a fluted/scalloped cutter to make it a little girlier in this instance, but again, you can use a regular circle as well.
- Food safe brush & water
- Round tips (in this case, I used Wilton tips in sizes 12 and 3
- Small cutters for ghost accessories ~ I used a butterfly cutter for the bow and a small leaf-like cutter for the mask.
- I find it very difficult to locate small cutters, especially in the exact shapes I need, so the key is to be creative and use what you have or can find to envision something new!
Start out by rolling the beige color into a ball (about 1″) and then using your fingers to shape it into a longer roll. If the fondant cracks a little, add a little shortening to it and massage it in to go back to shaping it. When done, place it on your table and make sure it sits upright.
Use another piece of beige fondant, rolling it out flat about 1/8″ thick. I like to use rolling pin guide rings to maintain a consistent surface. Then use the cutter to punch out the round shape and apply some water to the bottom of it to attach it to the “body”.
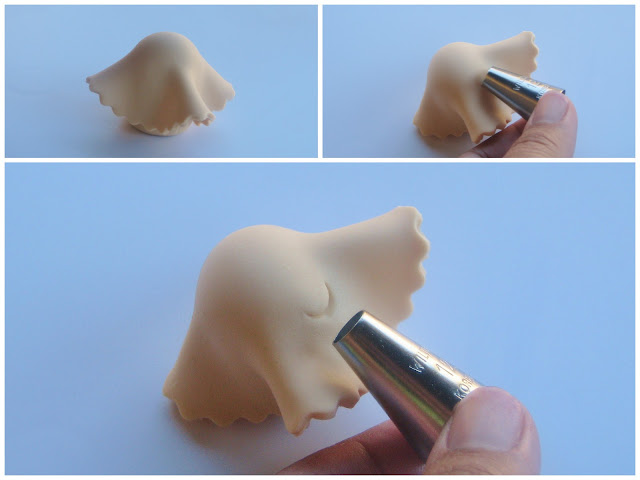
Once you place the round cut-out over the body/roll, try to position your fingers so that it pushes some sides down, while allowing some of the fondant to stick out like a flowing sheet.
To make the mouth, utilize the larger tip to make an indentation on the side you’ve determine is the front of the ghost. Be sure to hold it more diagonal and not straight on so you are only catching the bottom side of the tip and not making a full circle… unless you was a very surprised/scared ghost!
To make the mask, roll out the black fondant and utilize your cutter to punch out a small piece. With this leaf/oval shape, you can utilize the bottom of your brush to push in the middle a bit of both the top and the bottom. Then you can use the small tip to punch little holes where the eyes should be positioned on the mask.
Once cut out, apply more water to the mask and attach it to the ghost.
Hope you’ll have fun making some cute little ghosts of your own! Now to finally get to this year’s costumes… only one week left! Happy Haunting!!!
Merci Beaucoup!

This page may contain affiliate links. For more information, please read my Terms & Disclosure policy.


LOVE the little witches’ but that HK is just something else!! ;D
You guys look adorable!! can’t wait to see what’s this year’s costume!!
XOXO
Bird
preggo witches? and two of them? lol that is too funny!
love this tutorial! i’ll repost to our fb page!
much love, mindy
CREATIVE JUICE
LoVe the tutorial! Everyone is adorable, Lynlee!
Oh my gosh, so ADORABLE!!! I am loving all those little cake toppers!
You all are too adorable in your costumes!!
Love all the goodies! So darn cute!
Great tutorial..but I am afraid my li ghost would look nothing like that! LOL!
love it!!!!
xoxo- stan
Merci beaucoup, everyone! It’s been such a fun year with all these Halloween designs! Thank you so much for all the sweetness! ♥
I am totally in awe of your skills! Too cute.
Eleanor
Thank you so very much, Eleanor!!! 🙂
This is soooo cute! You are so talented. I’m delighted to have discovered your work today. Cheers!
Really great work! Thanks for sharing!