• Home
    • Blog
  • About
    • About Me
    • Press and Features
    • Terms & Disclosure
  • Sweet Life
    • Crafts & Recipes
    • Family Fun
    • Holidays
      • Valentine’s Day
      • Lunar New Year
      • Easter
      • Halloween
    • Sweet Shop
      • Sweet Finds
      • Publications
  • Sweet Parties
    • Lynlee’s Parties
    • Party Tips
  • Sweet Fondant
    • Fondant Topper Gallery
    • Fondant Tutorials
  • Sweet & Unique Book
    • Book Tour
    • Blog Tour
  • Contact
    • Facebook
    • Flickr
    • Instagram
    • Pinterest
    • Twitter

Lynlees

Never Miss a Post!

Peek-a-Boo Bunnies Fondant Tutorial

March 18, 2013 By Lynlee

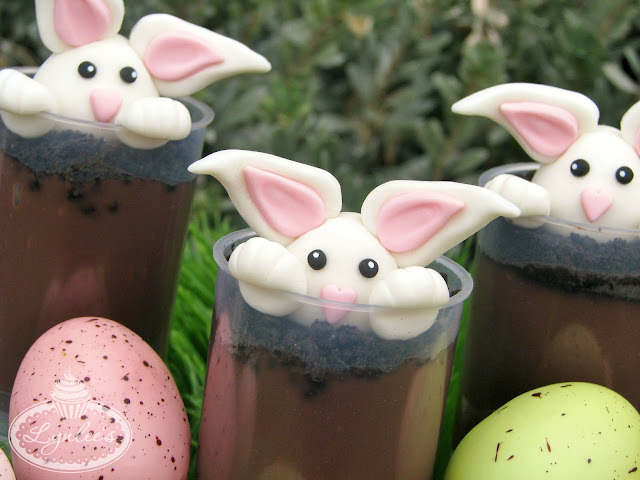
As East­er is just around the cor­ner, I’m excit­ed to share this “Peek-a-Boo Bun­nies” tuto­r­i­al fea­tured in the Spring 2013 issue of The Par­ty Dress Mag­a­zine! Last year, I had the immense plea­sure of styling the East­er Egg Hunt par­ty for their 2012 issue and was so extreme­ly grate­ful for all the amaz­ing and sup­port­ive feed­back I received for the “bun­ny bum” push pops div­ing into their rab­bit holes! The bun­nies are back this year and are pop­ping up to take a peek and see if every­one’s ready for an ear­ly Easter!

Sup­plies you will need:

  • white, pink and black fondant
  • rolling pin
  • large and small leaf cutters
  • round tip {in this case, Wilton tips 12 and 5}
  • mod­el­ing stick and knife tools
  • food safe brush and water
  • raw spaghet­ti
  • white soft gel paste & toothpick
  • push up con­tain­er, crushed Ore­os and choco­late pudding

Roll some white fon­dant into a ball and shape the top nar­row­er with your fin­gers, mak­ing sure it remains nice and rounded.

Roll out white and pink fon­dant and cut out two each with large and small leaf cut­ters respec­tive­ly. Use water to glue pink over white and indent with mod­el­ing stick. Insert small piece of raw spaghet­ti into ears and glue into the head.

Roll out pink fon­dant and use larg­er tip to cut out a cir­cle. Pinch one side with you fin­gers and use the knife to indent the oth­er side to cre­ate a heart and glue onto face. Roll out black fon­dant, cut out two small cir­cles for the eyes and glue. Uti­lize the tooth­pick to dip into white gel paste and “dot” the eyes.

Roll two small white fon­dant balls for the hands. With the knife tool, make three inden­ta­tions for fin­gers. Turn it upside down and make an inden­ta­tion with the mod­el­ing stick. Place on push up con­tain­er to mold.

Fill push up con­tain­er with pud­ding and crushed Ore­os and fin­ish it off by adding the bun­ny head and hands! You can vary the ears and eyes so the bun­nies are look­ing in dif­fer­ent direc­tions as they are pop­ping up and tak­ing a peek pri­or to hid­ing some eggs!

And don’t for­get, if you are inter­est­ed in the instruc­tions for last year’s “Bun­ny Bums”, it is avail­able, along with addi­tion­al inspi­ra­tion and tuto­ri­als in this year’s Farm Fresh East­er publication!

Merci Beaucoup!


This page may con­tain affil­i­ate links. For more infor­ma­tion, please read my Terms & Dis­clo­sure policy.
 

Share this:

  • Tweet
  • Email

Filed Under: Easter, Fondant Toppers, Tutorials Tagged With: bunnies, bunny, cupcake toppers, cupcakes, easter, fondant, party, toppers, tutorial

« Lynlee’s Farm Fresh Easter
Sweet Book Deal! »

Comments

  1. Angela and Jeffrey says

    March 18, 2013 at 10:28 am

    So cute!!

Trackbacks

  1. Lucky Leprechaun Fondant Tutorial - Lynlee's says:
    March 14, 2014 at 6:01 am

    […] a pot of gold for this fon­dant project. This could also work well with push pops, much like these Peek-a-Boo Bun­nies I made […]

  2. A Groundhog Day Fondant Push Pop Tutorial ~ Lynlee's says:
    January 31, 2015 at 6:02 am

    […] few years ago, I cre­ated this Peek-a-Boo Bun­nies tuto­r­ial for East­er and I thought the con­cept would be per­fect for a Ground­hog Day! You can fill the […]

  3. Don't Put All Your Eggs in One Chick Basket With this Easter Cupcake! says:
    March 19, 2015 at 10:59 pm

    […] Peek-a-Boo Bun­nies fon­dant tutorial […]

Bienvenue!


Sharing inspiration as a
fondant artist, party stylist, lifestyle
blogger and book author!

Purchase My Book!

Sweet&Unique”=

Purchase My Class!

Search Lynlees

Follow Via Email

My Recent Pins

  • Gold Tone Hardware, Heart Shaped Detail, Top Carry Handle, Adjustable Detachable Crossbody Strap, Debossed Brand Logo Accents, 8.5In W X 11In H, 53.5In Strap, Fully Extended, Zip Closure, 1 Interior Zip Pocket, 1 Interior Slip Pocket, Non Leather, Imported | Cupid Heart Bag For Women
  • A Not So Scary Mickey Mouse themed Halloween party with a shabby chic look! See more party planning ideas at CatchMyParty.com!
  • Disney party table / food display, cute Mickey pumpkin for Halloween
  • Some great ideas for a Mickey's Not-So-Scare Halloween Supper Buffet. (I have seen the Mickey Mouse shaped plates at Target.)
  • Some fun buffet ideas for a Mickey Mouse & Friends Halloween Party.
  • Mickey Cupcakes
Follow Me on Pinterest

Join Us On Instagram

Copyright © 2025 Lynlee's • Website Customization by Brave Creative Design · Log in